Testing Laser Cutter on Various Plastic Types
Author’s Note! This article has been imported from my previous website. I wanted to preserve all of the old content as many people have found some value in it. There may be some broken links and or formatting issues. If something isn’t right, please let me know and I’ll do my best to make an update.
On a client project I’ve been working on (sorry it’s kinda secret), I needed to manufacture a rigid surface upon which to mount various components. Because this surface would need a custom design and lots of specific holes, a laser cutter seemed like the ideal choice. I wanted to experiment with several types of material that might yield a good surface finish from the laser, and also remain ridged in the installation.
I wasn’t super happy with what I found on the internet, with regards to which thicknesses per wattage, or what the edge finish would be like, etc. So I thought I’d do some of the testing myself. In addition to the materials I’m considering for the required surface, I also scrounged around for some other materials to bulk out the test. At the very least, I can just refer back to this article for future settings.
The Laser Cutter
I’m doing my testing on this 100 Watt Laser Cutter.
Near I can tell, it is the same as this model on eBay, but with a 100 watt tube. There appear to be several outlets importing these low cost, Chinese-made cutters. They have similar interfaces and control software, and are quite good for the price.
The Test Materials
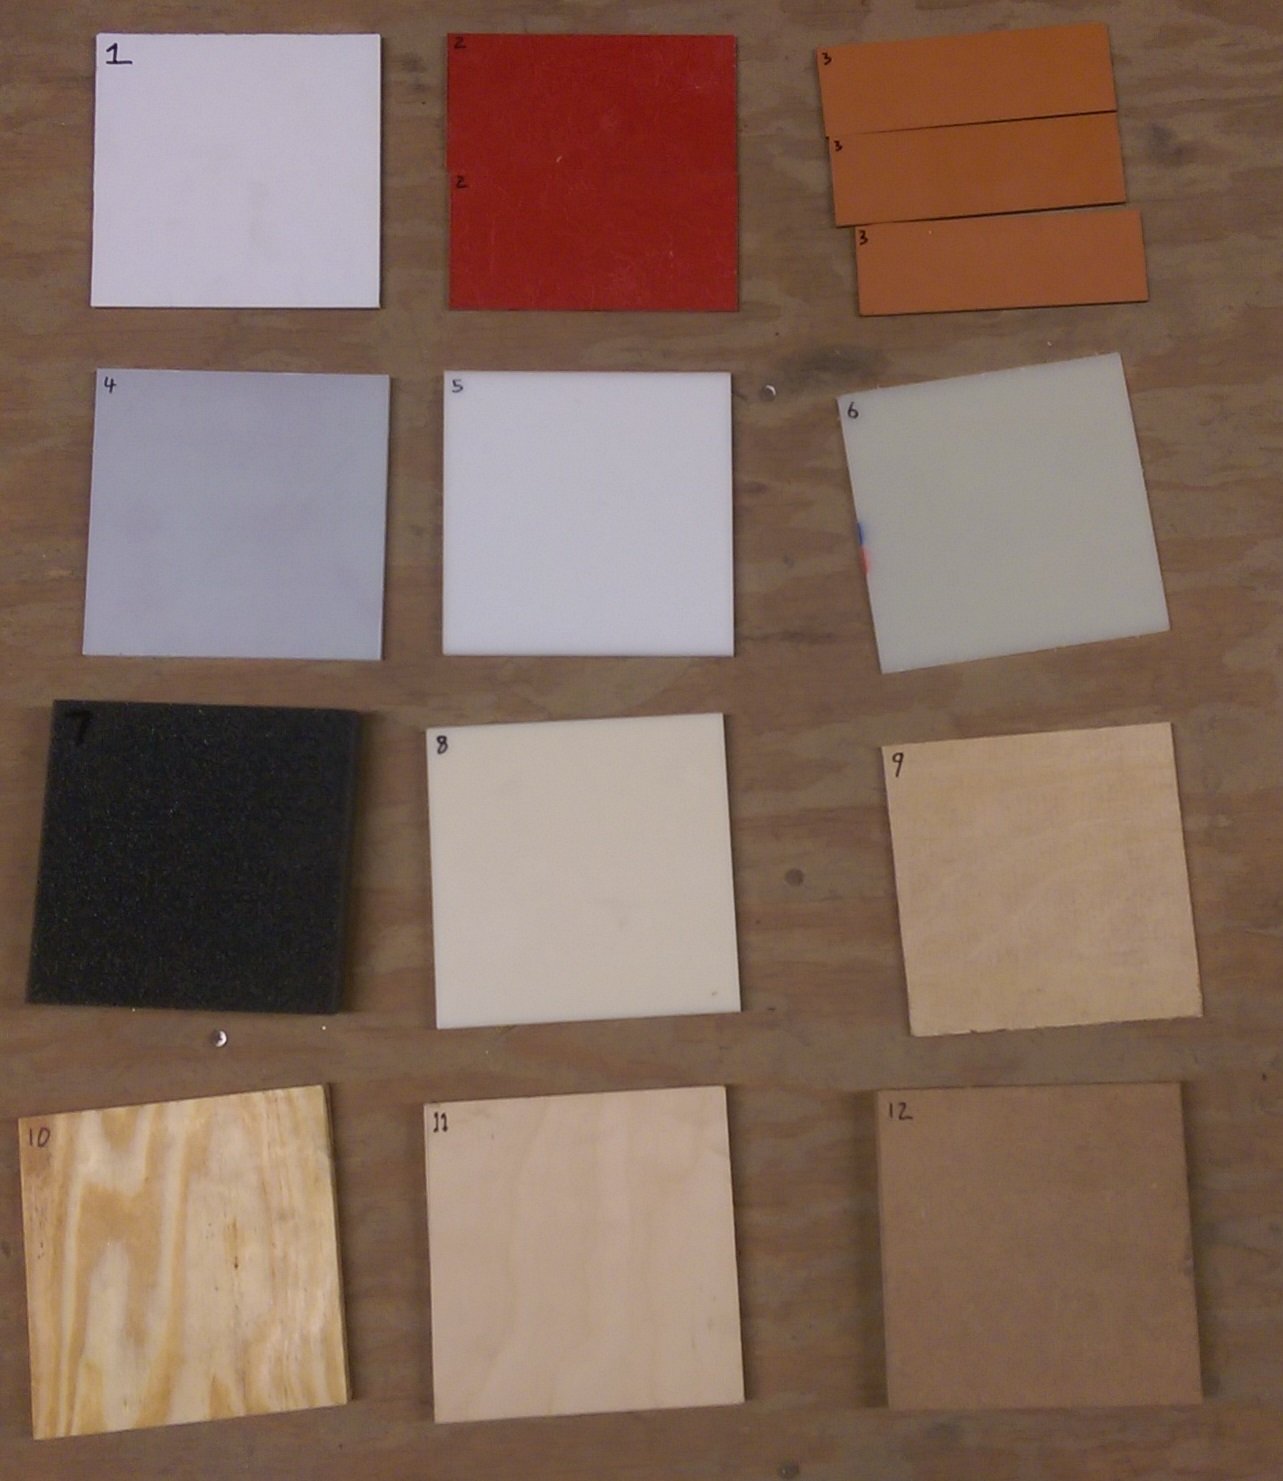
My preference was to use the same thicknesses throughout, but not everything was available in smaller quantities. Depending on how the materials cut, we might extrapolate when penetration would occur with thinner versions of the thicker materials. Also, let’s throw some wood in there for a pseudo control. Here is what I’m going to put through the test:
(1) - ¼" White Polystyrene
(2) - 1/8" GPO3 Electrical Grade Fiberglass
(3) - 1/8" Grade XX Garolite
(4) - ¼" Clear Impact Resistant Polycarbonate
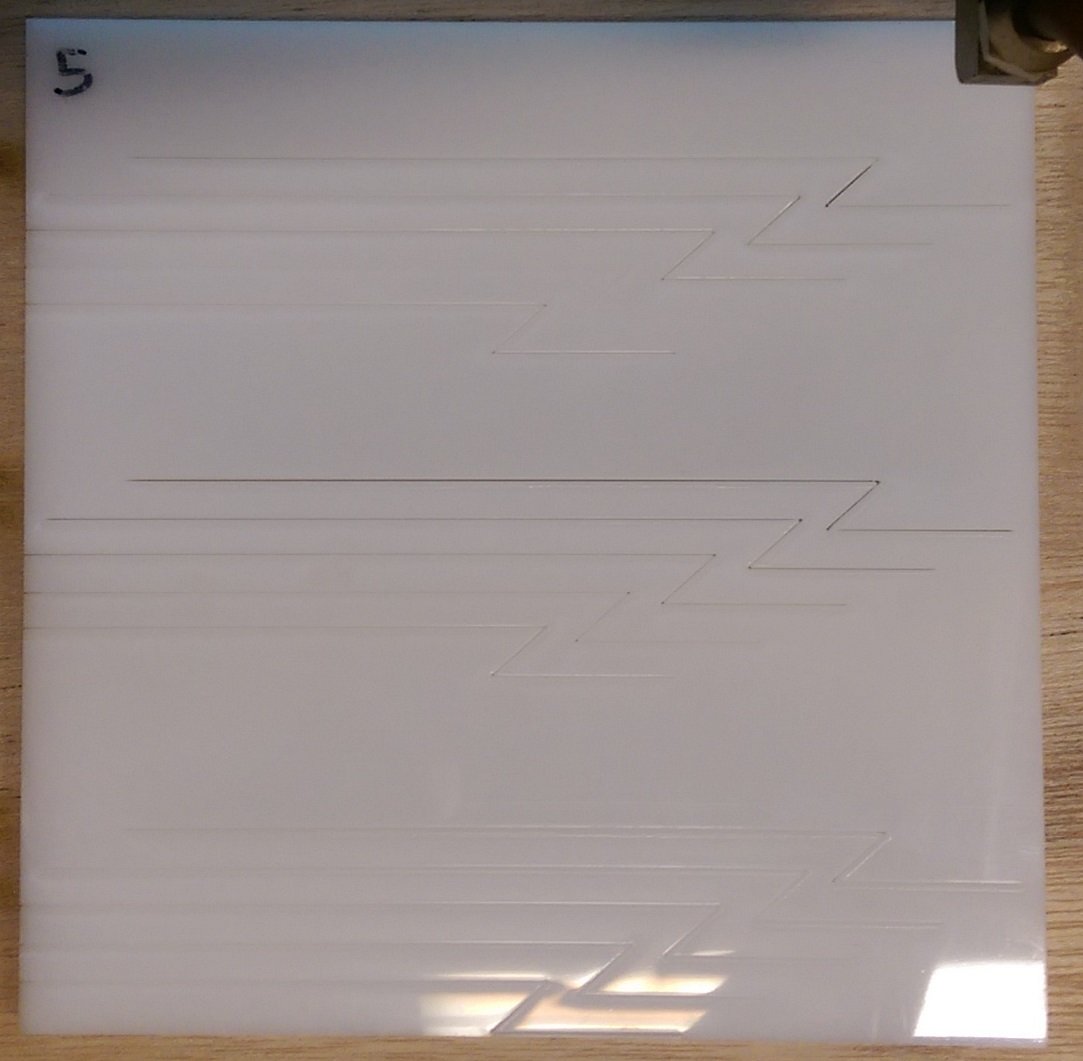
(5) - ¼" White Delrin Acetal Resin
(6) - 1/8" Wear-Resistant Nylon
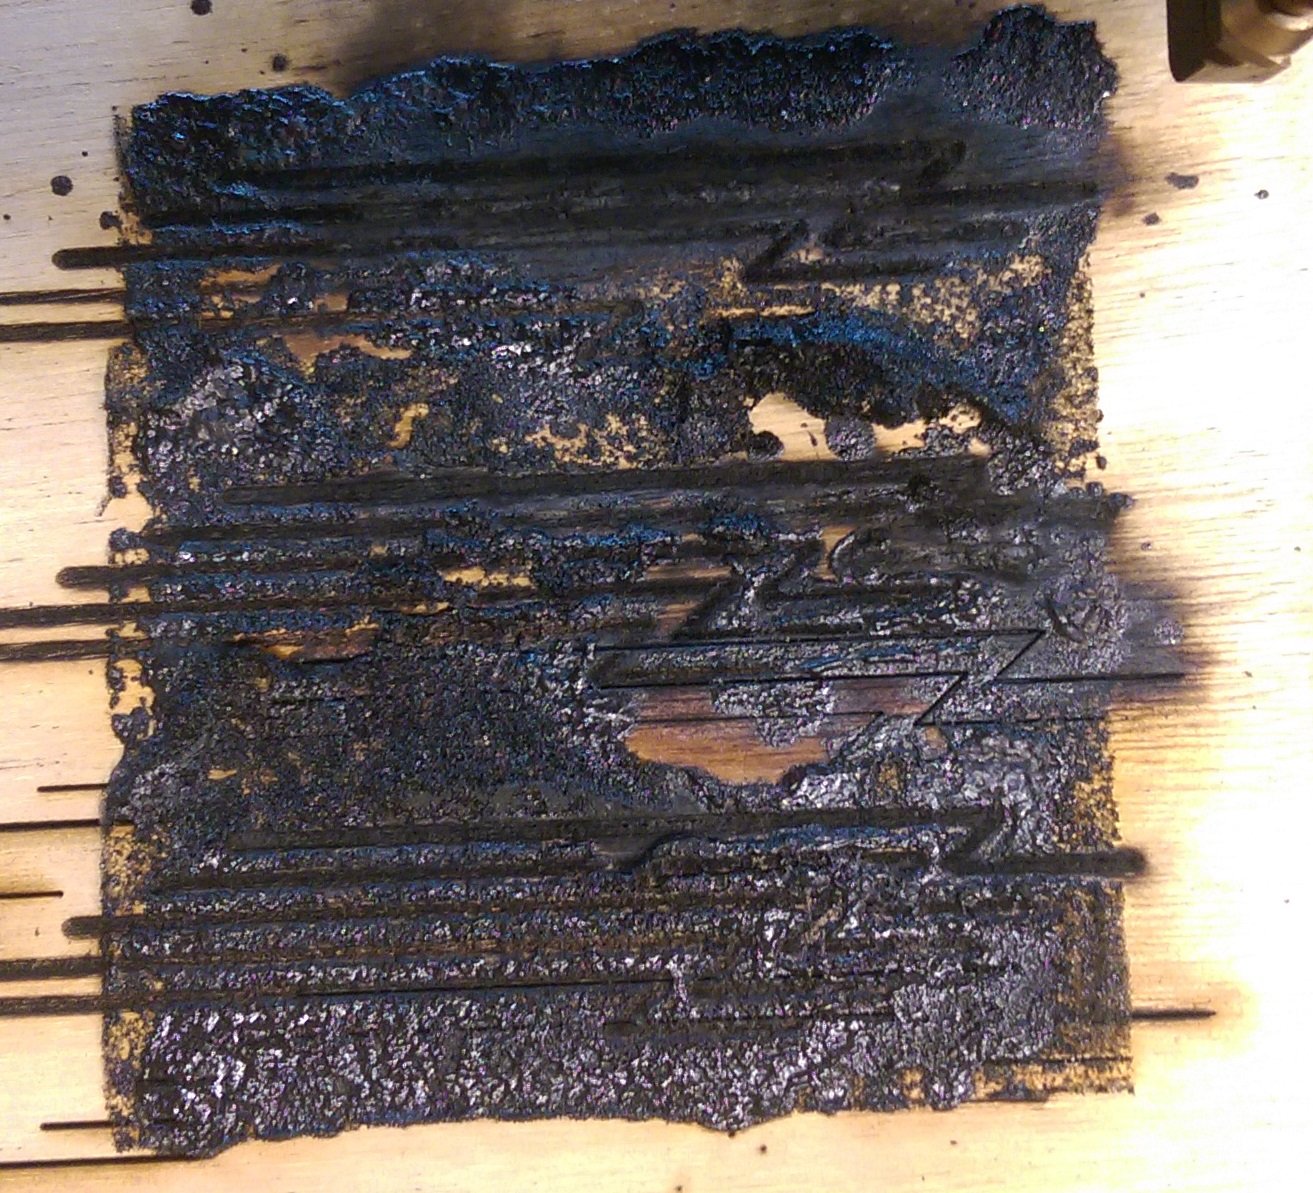
(7) - 1" Polyurethane Foam (From the bottom of a Pelican Case)
(8) - 3/8" Natural ABS
(9) - 0.189" Nice Veneer Plywood
(10) - 0.455" 3 Ply Regular Plywood
(11) - 0.475" Nice Veneer Plywood
(12) - ¾" MDF
Test Plan
This laser I’m using is typically only ever maxed out at “95”, which I assume to mean 95% power (which at 100 Watts is, of course, 95 Watts). Although, I can’t be completely certain this is how the the power scales. My plan is to execute several cuts at different power levels and different movement speeds.
Speeds
5 mm/s
10 mm/s
15 mm/s
20 mm/s
25 mm/s
Power Levels
95
80
60
Each sample is about 6" square and will be supported by a thin plywood backer board. The backer board should help to attenuate the laser burn through which in some cases, starts a fire on the back of the plastic, warping it or discoloring things. Hopefully, the backing material should make the test more uniform.
I’ll run each of the speeds for each of the power level zones, and photograph the results, recording any visual notes. I was curious about heat build up in the corners, which is why the cut paths below have bends. Obviously, these materials are all rather different, and my goal is not really to zero in on the perfect settings for any particular material, but rather show how each works across various types. This should aid in dialing in settings for the future.
Test Results
I was pretty happy with how each sample ran (except for one, see below). For each sample, I’ll show a picture or two of the cuts, list any observations during the cut, and also list which setting combinations cut completely through the materials, ordered in terms of surface finish. Basically, the top setting is what I’d use again. In the pictures below, remember that from bottom to top we have 95 power zone, 80 power zone, then 60 power zone. Within each zone, we have the top having the slowest speed (5 mm/s) all the way down to the bottom of the zone at 25 mm/s.
(1) - ¼" White Polystyrene
Observations
The high heat of some settings cause the plastic to warp badly and blister a little. There was lots of white smoke. I was surprised how, even at low power, good penetration was achieved; the speed seems more important than the power.
Settings Recommendations
60% @ 5 mm/s
80% @ 10 mm/s
80% @ 5 mm/s
95% @ 10 mm/s
95% @ 5 mm/s
(2) - 1/8" GPO3 Electrical Grade Fiberglass
Observations
This material makes a buzzing sound during the cuts, kind of like there is something caught in a metal fan. I’m guessing it is the fibers exploding or something.
Settings Recommendations
There was no penetration at the tested settings (but I did get it later on, see the end of the article). At this thickness, 80% and 95% at 5 mm/s cut deep enough that you could break off straight cuts.
(3) - 1/8" Grade XX Garolite
Observations
The cuts seem to shoot a bit of flame jet out of where the laser is hitting the material, also making a “hissing” sound, like the above. High power started to burn what appears to be some sort of paper veneer on this stuff.
Settings Recommendations
No penetration at any power level, with 95% @ 5 mm/s it cuts about halfway though. See the end of the article for more tests on this material.
(4) - ¼" Clear Impact Resistant Polycarbonate
Observations
The cuts produced lots of white smoke. As you can see from the reverse picture, it has a pretty cool cut pattern. I cut it with the plastic sheeting on, which may have burned into the cut discoloring it. While there was no penetration, it appears that slower cuts or thinner stock would work. The cuts that went deepest did not seem to re-weld, and so this might be a good candidate for laser cutting if you need a clear plastic that is stronger than acrylic.
Settings Recommendations
No penetration for this thickness; high power across all speed ranges would be suggested for 1/8" or thinner stock.
(5) - ¼" White Delrin Acetal Resin
Observations
The laser flickered when cutting and seemed to produce small stringy hairs from the cuts. Reasonably good surface finish and penetration on more powerful settings. A little discoloration on the opposite side. I’m pretty pleased with this and always liked Acetal for various uses. It machines well and clearly can be laser cut.
Settings Recommendations
80% @ 5 mm/s
95% @ 5 mm/s
(6) - 1/8" Wear-Resistant Nylon
Observations
The laser flickered through this translucent material, and smelled really horrible while cutting. It was melty and welded back together on hot, slow cuts. I might not use this material with a laser cutter at all.
Settings Recommendations
There was a lot of penetration on this thin stock, but many cuts welded back together; the two with the best surface finish that didn’t re-weld were:
80% @ 15 mm/s
60% @ 10 mm/s
(7) - 1" Polyurethane Foam
Observations
This material had a bad day in the laser cutter. The first cut at high power started it on fire, and subsequent cuts only added to the chaos. Well before all the cuts were complete, the fire had mutilated the whole sample and burnt it into the backer board.
Settings Recommendations
I would imagine that a very fast pass at low, low power would successfully cut this material. At these settings though, it didn’t stand a chance.
(8) - 3/8" Natural ABS
Observations
Tons of white smoke during the cut and it was rather smelly. The cuts blister in a yellow way, and the corners are melted. I would not be confident the parts would separate if there was penetration through thinner stock.
Settings Recommendations
No penetration, however, it appears you could cut ¼" stock with 95% @ 5 mm/s and 1/16" stock with 60% @ 5 or 10 mm/s.
(9) - 0.189" Nice Veneer Plywood
Observations
Clearly, the laser cutter loves ¼" veneer plywood– all the settings penetrated.
Settings Recommendations
All the settings worked, but I’d recommend 60% @ 25 mm/s for fast cuts with minimum surface discoloration. Higher power levels may be better if there are areas where the wood toughness changes.
(10) 0.455" 3 Ply Regular Plywood
Observations
No penetration observed, which is odd given the performance of the nicer plywood below, perhaps normal plywood uses harder materials than the cabinet grade.
Settings Recommendations
No penetration at this thickness.
(11) - 0.475" Nice Veneer Plywood
Observations
Surprised by penetration on the higher settings; this is nearly half an inch thick, and the laser cut it. Normal wood burn discoloration.
Settings Recommendations
60% @ 5 mm/s
80% @ 5 mm/s
95% @ 5 mm/s
(12) - ¾" MDF
Observations
MDF is one of those materials that people love to laser cut. This was pretty thick, but had good surface finish and seeming depth of cut at higher power levels.
Settings Recommendations
It’s hard to go wrong here; there was no penetration at this thickness, but you can be safe using most combinations on thinner stuff like the plywood.
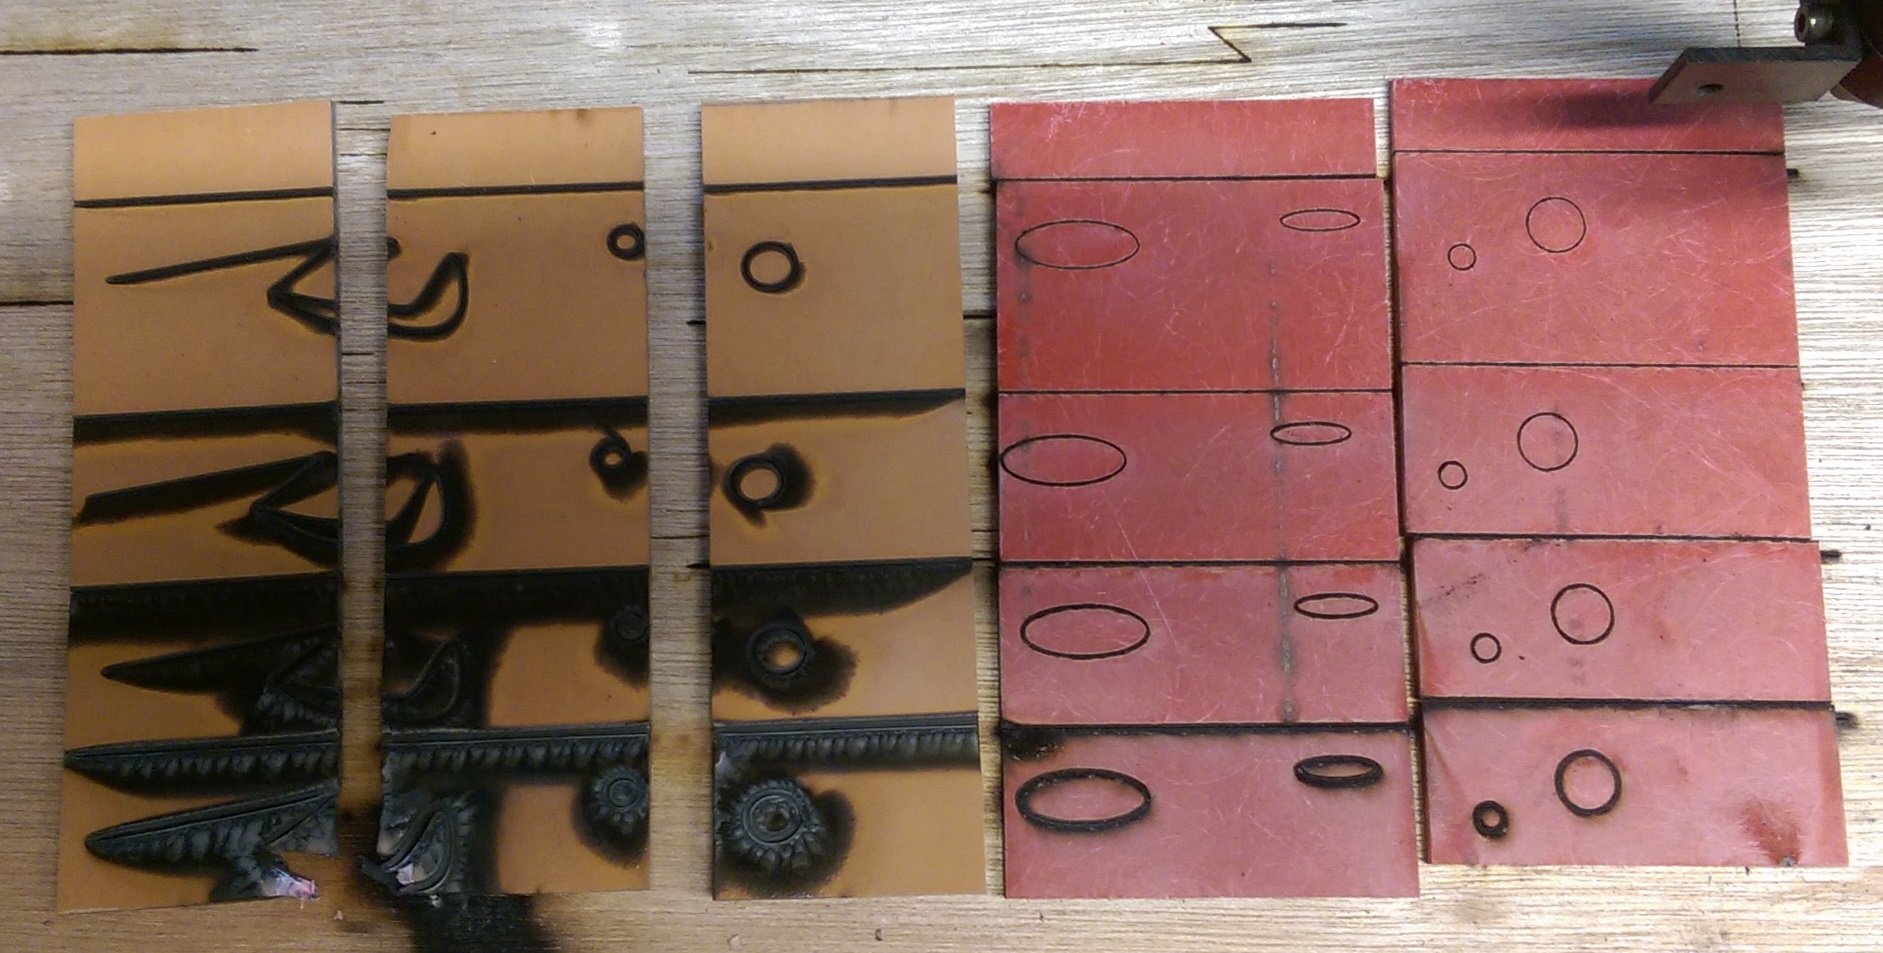
Second Test Results on GPO3 and Garolite XX
After all the tests were complete, there wasn’t a single plastic specimen that seemed to cut well enough to use for my application. Acetal was likely the front runner, but I wasn’t super amped about using it at the thickness required for the rigidity.
Two of the materials that seemed most appropriate, the GPO3 and Garolite XX, did not penetrate in the initial tests, so I thought I’d run them both through another test to see what was possible. For this test, I drew lines, a curve, and some holes to get closer to what the final product might require.
For this test, I kicked the power up to 97% and ran four zones, 4, 3, 2, and 1 mm/s. (Which is top to bottom in the picture below).
Observations
Apparently, Garolite is also “Bakelite,” and is a really strange material. It does not seem suited to the laser cutter at all. At high power running at very slow settings, there was still no penetration, and all I seemed to do was just burn/destroy the material (Bottom left in the picture above).
The GPO3, on the other hand, had good penetration. The surface finish wasn’t wildly good, a little charred and burned. It also leaves a pretty sooty dust. It looks like it could be cleaned up with a little scrubbing. The material is a “PGM composite sheet produced from glass mat and polyester resin”. My hope was that this material would be viable given it’s electrical properties and rigidity.
Settings Recommendations
For the GPO3 I’d recommend:
97% @ 3 mm/s
97% @ 4 mm/s
Conclusion
I hope readers of this article will find this information valuable, and save you time setting up your laser cuts or choosing materials. In the end, my hunch was confirmed that GPO3 would be a good candidate for my project. Please email me or hit me up via the methods at the bottom of this page if you have any questions/clarifications. I’d be glad to help!
Happy laser cutting!